Moving your WordPress website to a new hosting service provider could be a quite difficult and painful experience, but it not to be need. Many WordPress users are needs to move to a new hosting service provider. Because of problems are facing with their current hosting provider. So, they are just getting just enough. Finally, they decide migrating to a more reliable hosting service. Most of time you afraid and makes a mistake and results to damaging your business site(s).
To away from the problem, people will have three options either they hire professional to migrate their site for them. As they have 2nd option to find a new hosting service provider so they provide a service as a part of host package, Or take the third option of having a go at itself.
Some Sumarizied Points of Article
It can be a very simple and straight project if do correctly and can pretty easy to be back out of should any issues occur.
Let’s follow pretty simple steps to move your site to another hosting service.
*** First Way : Manual Migration Steps ***
Step 1: At Very First Take Backup of your Website Files

There are plenty of plugins out there that will take complete backup of your WordPress site for you. This type of back up however, needs a manual approach. With the use of FTP like FileZilla which connect to your web host and take backup of all files under your sites directory to a folder on your system.
This can include the .htaccess file that is set to be hidden. With the help of FTP program you can see the hidden files again.
For taking backup, the process may take some time. Because, it is depends on the media uploads you have in your site so that this could take time. While downloading is going side by side you can get a backup of your database.
Step 2: Exporting the valuable WordPress Database
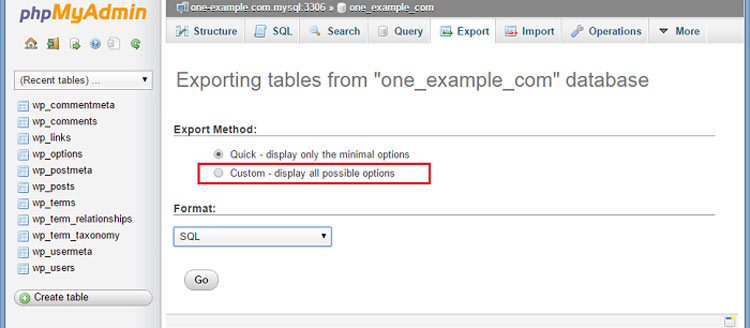
WordPress database export is a simple process. Just log in to cPanel and open the phpMyAdmin. From the left hand sidebar list, select the database which contains your WordPress installation. After selecting database, click on the Export tab from navigation menu.
There are two options coming up with setting. The very first is a Quick export and the second one is SQL format for the export. These two are sufficient for actually what we require. Simply hit on Go button and here the database export process will start and file will be downloaded to your system.
After completing both the processes; FTP transfer of your files and database export. You are now ready to forward on the very next stage.
Step 3: Creating Database of Your WordPress site on New Hosting Server
Before you start migration to new web hosting, you need to create a setup of WordPress installation. For this you must create a database so that you import the exported database.
Login to new hosting site with username and password and connect to the cPanel. If your new host doesn’t have MySQL database application running then you need to contact with them for help of creating new databases.
Creating a database is pretty easy let’s have a look:
- Open MySQL database and create a new database with proper name related to your website.
- Create a new MySQL user with secure password to modify further confidential process.
- By adding this user in to database, grant all the privileges to this newly created user.
Remember the Database name, the new MySQL credentials. You will be required these two terms further very soon.
Step 4: Needy Modifications with the wp-config.php File
Just browse the website files which are downloaded. In that directory there is a file wp-config.php that controls interface between WordPress and your database.
Simply take Backup of this file in another folder on your system. Because, if accidentally you go wrong then you will restore it.
Open the original file and open it in text editor and make some following changes.
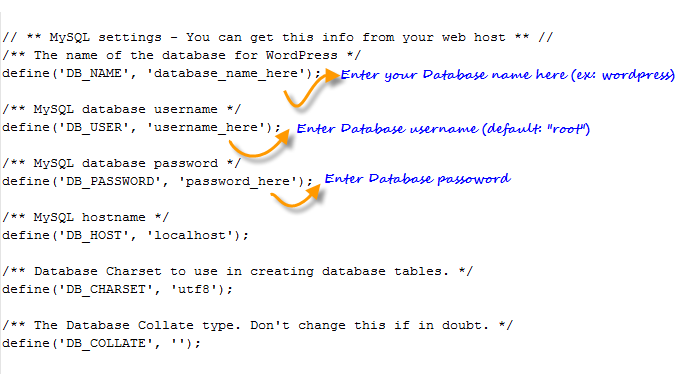
Change Database Name, Username and Password
Find the below line for changing Database name
define(‘DB_NAME’, ‘database_name_here’);
The db_name will currently set to MySQL database name to your previous web host. This can modify name of the database which you just created.
Find the below line for changing Username
define(‘DB-USER’, ‘username_here’);
You just simply change db_user. With the change of this username of your previous host match the latest username which you just created.
Find the below line for changing Password
define(‘DB_PASSWORD’, ‘database_paasword_here’);
With the change in db_pass it must change to the new and secured password which you just created for your MySQL user access.
Now, don’t forget to save the modified wp-config.php file. After saving close the file.
Step 5: Importing Your Database to New Hosting Database
Before importing database you have a new database to work.
Now, go to phpMyAdmin from the cPanelon your new host server. Select the new database from the left hand sidebar. When you open it you will find the Import tab from the navigation menu.
After this browse the exported Database and select it for import. Then Click on the Go button.It starts importing database.
It will take some time because depending on the size of Database it will require some time. After completing Import process pop up will displays import successfully.
Step 6: Upload WordPress Files to Your New Hosting server
You are pretty much ready to upload your WordPress files on the new host. Before that you are having the new Database and the modified wp-config.php file.
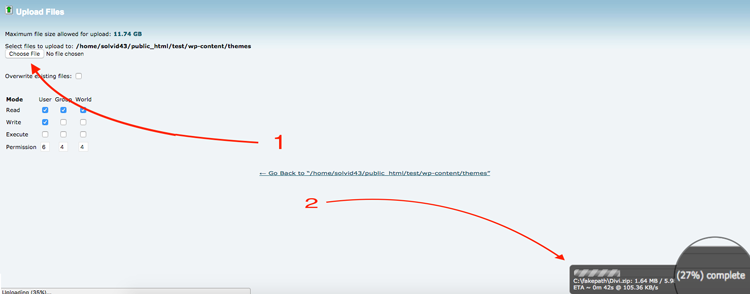
Now, start the upload WordPress files. Simply connect to FTP program of new host and browse the directory folder that your website is going to behave. If this folder directory is primary one, or only WordPress site being installed on this server then upload the files to the public_html folder is the common directory.
With the selected remote directory you can upload website files. And that should be the new updated and modified version of wp-config.php. This process takes time depending on the size of website files.
Do not delete files which are present in system during upload. Files are still required until the last step to complete.
Step 7: Defining New Domain Name and Linking to New URL
These are the common problems people always seem while moving their site.
- Links from existing content pointing to old site.
- Inserted images which are directly pointing to image URL of old site.
This caused in to break when moved to the latest domain. You need to change your previous domain name with latest domain name, and then the process is quite simple and fast.
This job you can do very easily with the help of Search Replace DB script.
This is simply allows you to replace previous domain name with latest domain name from your database.
Note:DELETE Search Replace DB from server, when you are done with this (security reasons).
Also you can follow standard documentation to change from old site_url to newsite_url by referring Change WP Site URL guide from here…
*** Second Way : Export/Import WP Migration Plugin ***
You can do one click export, import and backups process by All-in-One WP Migration Plugin.
This plugin is a combo of 3 features Export, import and Backup.
For demonstration check out these following videos:
*** Third Way : Claim Free Migration from DomainRacer ***
Yes, DomainRacer will offer you free WordPress migration, We knows what our customer need? and why then are with DR from very long time.
- Unlimited SSD Disk Space and Bandwidth
- Free 256-Bit SSL Certificate
- Secured by ModSecurity and MagicSpam Pro
- Full Acronis Daily backups at no extra cost
- 99.99% LiteSpeed Cloud Uptime Guarantee
These are extra ordinary feature we offers and will surely boost your business or website. If you need any support, directly contact our support team. We are happy to assist you.
Hope You guys got everything that you are looking to migrate your dream website. Have any suggestion?? please let us know. Have a great time…


